Showing posts with label distress ink oxides. Show all posts

Saturday, 21 October 2017

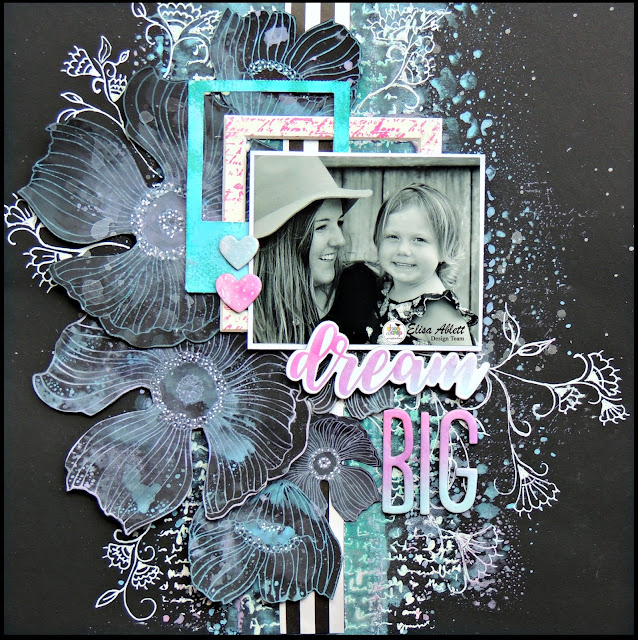
'Dream Big' by Elisa Ablett

Hi Everyone, 

My turn up on the blog today with something a little different for me - BACK TO BLACK!

I don't normally do a black cardstock background but with the Distress Oxide Inks, an awesome stamp set and a cool technique or two and the I just wanted to try one.


Here is a step by step tutorial on how I made the gorgeous flowers with the distress oxide ink pads.


Step 1 - using a nice smooth black cardstock, ink the middle of your stamp with the 'wilted violet' oxide ink pad and the the outsides of the stamp with the 'picked raspberry'. Then using the smaller of the stamps use 'cracked pistachio' ink pad. 


Step 2 - Stamp all over your black cardstock, as you can see the Oxide Ink pads stamp beautifully over the black and come out in almost chalky neon colours.


Step 3 - Smudge your ink pads onto your craft mat and spritz with water liberally. Then using a paint brush splat and drip the liquid onto your cardstock over the top of your stamped images.


Step 4 - Add a bit more colour to the page by turning the cardstock upside down and dipping the flowers into the liquid on your mat and smoothing the back of the page with your hand. A close up below.


Step 5 - I also used the paint brush to add shading and colour to the inside of the flowers. 

Then lastly once they have dried, I fussy cut the flowers out and then using a white gel pen added white dots to the middle of the flowers as you can see from the close ups!


Here are the close ups for the finer details!


Here are the products used to create my layout from the Shop.


Prima Bloom Floral stamps only available in the one off mixed media mania kit.
Image result for prima bloom floral stamps


Preorder : Tim Holtz Distress Oxide Ink Pad Bundle 2


Thanks for stopping by the blog today 😀

Elisa xx


Friday, 29 September 2017

'Be Brave' and 'Daydream' by Elisa Ablett

Hi everyone, 

Elisa here from the design team with my latest creations for Shop and Crop Scrapbooking.

Did you know that if you place an order with Shop and Crop Scrapbooking you can use the code EA5 at the checkout to receive a discount !

Today I am sharing with you a layout I created using the We R Memory Keepers (High Five Collection) from the we-r-memory-keepers-high-five-collection-bundle-kit that is available from the Shop. This bundle is awesome as you get the full matching kit and embellishments, perfect for those boy layouts!

I am also sharing a mixed media tag using the leftovers from Expo Kit No.9 and Distress Ink Oxides which are also available from the Shop in an amazing bundle deal!

Kylie at Shop and Crop is doing a deal on the entire first set of inks for $100. If you use the code EA5, you can get a further $5 off. It truly is the best bargain on this complete set i have seen out there. I've ordered a set! the same deal is available on Set 2.


To achieve the watercolour background look I used water and Broken China Distress Stain and also splashes of Black Dylusions Spray. Then I added stamping with this amazing Arty Triangles stamp from Darkroom Door. I also used a texture die cut from Kaisercraft.

Now onto my mixed media tag using the Distress Ink Oxides and the leftovers i had from Expo Kit 9.

 I SO LOVE these stamp pads, they are a must have item. This is the finished result, I have included a small tutorial so keep reading!


I wanted to share a step by step tutorial with you on how I created the background using the Oxide Ink pads.


Firstly I chose my favourite beachy colours Salty Ocean, Broken China, Peacock Feathers and Antique Linen and grabbed my spray bottle of water. I gesso'd my mixed media tag and other chipboard pieces and let them dry.


Firstly I laid down my first colour by rubbing the inkpad directly onto my craft mat and then spraying liberally with water, then I dipped the tag upside down into the large droplets of colour, creating water patterns on the tag. 


The awesome thing about the Oxides is that you can layer the colours on, one by one and they dont produce that horrible mud colour you get with watercolours, when you mix colours together!!! So keep layering your colours on your tag and dry with a heat gun in between.


Next step is to drop large droplets of water directly onto your tag from a large paintbrush and dry immediately with a heat gun, it produces these lovely bleached circles on your tag.


Another technique you can use is to apply the inkpad directly to your chipboard which causes the colour to deepen. Then add droplets of water over the top and dry immediately.


Onto the last step for your background on the tag! Stamp using the oxide inkpads onto your tag, you will get the lovely deeper colour.

Here are some close ups of the finished tag!


Well thats it from me today! I hope you have enjoyed the tutorial, make sure you leave me some love and if you want to see more of my work and subscribe to my blog you can visit my blog here - 2crazycrafters


Elisa xx


Wednesday, 30 August 2017

1 Sketch 2 ways, His and Hers

Hi Guys, its Tanya here!

Today I'm going to share a couple layouts from a single sketch i created (could work great for a double layout). A his and Hers layout, simple to do if you switch the colors of your layout.


The products i used are 
White Watercolor Cardstock (this is my FAVORITE card to use for mixed media)
Random leftovers papers and titles from past kits
Washi Tape

To get started spritz page with water and then smoosh your ink pad onto a non-stick craft mat then smoosh your page into ink
flick with water and dry completely, then stamp randomly using the same color oxide ink

Next grab your sewing machine and add some stitching horizontally in black thread to add contrast and tear thin strips of Washi tape and stick horizontally randomly on page


Thats the background done!!
Now grab some paper scraps and build some layers, cut a tiny bit larger then your photo, 

Once that's all done stick the photo stack to page and add your title.
Repeat this but in the other color for the next page

Here is the sketch i created for this layout

That's all from me for now,
 Thanks for stopping by!


Monday, 28 August 2017

'Summer Loving' By Elisa Ablett

Hi everyone,


Elisa here from the design team back with a simple tutorial using the new Tim Holtz Distress Ink Oxides to make a mixed media layout using the leftovers from the August Crop Kit and a few things from my stash.

The Crop kit is chock full of amazing papers and embellishments and so far I have made 4 layouts out of it with leftovers !

If you are after Oxide inkpads or a Crop Kit order through
Kylie at the shop and use the code EA5 to receive a discount on me 😀😀

Kylie and I have come up with a special bundle deal for customers - Buy all 12 colours in series 1 and series 2 colour releases for a special price and receive an even further discount if you use the code EA5 just message Shop and Crop Scrapbooking for the details!!!

Here is my layout, a mixed media beach inspired layout.


Let's Get on with the tutorial!

I picked these lovely four beachy colours and grabbed my trusty water spray bottle to begin.

If you are unsure what the Oxide inkpads are and what makes them so crazy special, this is a description coming from Ranger and Tim Holtz -

"Tim Holtz Distress Oxide Ink Pads are water-reactive dye & pigment ink fusion that creates an oxidized effect when sprayed with water. Use with stamps, stencils, and direct to surface. Blend using Ink Blending Tools and Foam. Re-ink using Distress Oxide Reinkers"


Because they have pigment ink blended in with them they will stamp with a fine image, they are opaque so will show up perfectly on a dark surface, you can also layer the colours on top of each other and they still retain the colours and do not turn into brown smoosh. And the best thing is they still react with water like the Distress Ink pads.

I will be showing you a quick and simple tutorial on how to use these wonderful inkpads and how to apply them to a mixed media layout...


Step 1 - Grab your ink pad and smoosh it or wipe it onto your mat (special crafters mat that can be wiped over) spray the colour with water liberally to create large droplets


Step 2 - Turn a piece of mixed media cardstock over the colour on your sheet and place it on the colour. Now to get the droplets you can just pull the sheet back up without rubbing the back of the sheet with your hand or you can rub the back of the sheet to get a different look. Pull the sheet off the colour and dry with a heat gun.


Step 3 - While you are drying with your heatgun, grab a water spray bottle - the distress spray bottle is the best for this job as it releases rather large drops and spray onto your sheet over the colour and you will get this lovely oxidised droplet effect. 


Step 4 - After your first layer of colour, you can now add layer after layer using the same technique!! you will get a multi colour effect with lovely droplets and crazy oxide effect.


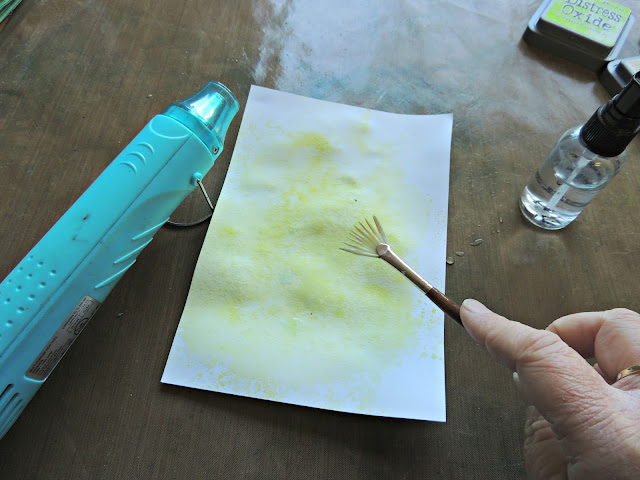
Step 5 - At the end you can also add another technique using a fan brush. Smoosh your colour onto your mat, add the water and then using the brush instead, dip it into the colour and tap generous droplets of colour onto your page and dry with a heatgun.

Below is a few examples of the end result of these techniques! perfect to use on a beach inspired layout ....right ??


Here is a few photos on how I incorporated these techniques on my layout.


Adding background colour to my page using the smooshing on the mat technique.


Adding some droplets of Antique Linen Oxide Ink pad to my page.


Use the inkpads to cover wood veneer or chipboard and use embellishments like DIY hearts from Charms Creations to mop up the colour on your mat and they will match your layout!!


I also used the technique on a couple of die cut square frames, which is a different and unique way of colouring and adding them to your page.


Add some stamping over your frames...


And here are some close ups of the finer details 


Well that's it from me today, i hope you have enjoyed the tutorial and insight into how you can incorporate simple yet effective techniques into your layouts.


Hugs 

Elisa xx