Showing posts with label Mixed Media Layout. Show all posts

Thursday, 21 September 2017

Mixed Media layouts by Tamara Buckler

Hello all,

Tamara here again today to share with you a couple of layouts I created using the Expo Kit No. 4.


My first layout is called 'Hello' and I used the white mixed media card stock from the kit and features a lot of the gorgeous 'vibrant turquoise' Dylusions spray. I achieved the affect you see here by using the packaging technique and a lot of water. The great thing about the mixed media cardstock is that you don't have to add Gesso, which I think gives a much more organic look, and it does hold a lot of water so you can achieve different effects.


I used the Dylusions 'Black Marble' spray to colour the Memory Maze chipboard, and then also by soaking up the ink with a dauber, I was able to push it through the Kaisercraft quad template. I then used some old Kaisercraft stamps from my stash for extra interest, and then the good old ink splatters with the Dylusions to finish the background off.


I inked around the edge of my picture using the dauber with the Dylusions ink and the layered up some paper scraps behind my pic. I then added in some thickers from my stash for the title, a bit of washi tape, some black cotton and some Tim Holtz 'Small Talk' to finish off my page.


My second layout is using the same kit, but this time on some black Kaisercraft cardstock I had in my stash.  To create the background I mixed some of the Dylusions 'Vibrant Turquoise' in with some texture paste and smeared it down the middle of the page. I then added some more for a deeper colour, and did the same thing down the left hand side. The gold smear is the Nuvo Gold Mousse, this stuff is delicious, seriously like icing!


Once the background had dried, I used the Nuvo Gold Mousse through the Kaisercraft quad template. I thought these grungy letters worked in really well with my back to school photo. I also ran the Gold Mousse around the edges of my pages, with the odd over smear around the page, which helped to grunge things up a bit. The gold on the black cardstock really pops!


I layered up the photo on the hessian included in the kit. This is so great for adding texture, I don't know why I don't use it more often! I added a little bit of journaling on the black journal spot included in the kit, some thickers from my stash and that was layout no. 2 done!


These kits are seriously such good value, and include so much product that you really can just keep going with them.

I hope you enjoyed my layouts today, and I'll be back again soon to share more with you!

Big Loves,
Tam x


Sunday, 17 September 2017

Mixed Media Fun with Sarah Rosse

Hello crafty friends, Sarah with you today using the AMAZING June Mixed Media Kit, designed by the one and only Elisa Ablett! That girl is seriously amazeballs! I had so much fun using this kit to make the cover page our our family 2017 album. The Mixed Media kit can be purchased instore as a once off or for a 6 month subscription. A subscription brings the price down to only $36.95 per month and what great value that is! The June kit is especially one of my favs due to the exclusive graffitti stamp in the kit designed by Elisa. I used this in one of my last blog posts and I just can't get enough of it!

This layout was completed on an 8.5x11 inch page and I followed the full step by step instructions that come with the kit - perhaps this layout size is a little small in hindsight to get the full effect of kit - I mean, you want to ensure you have enough room for those gorgeous paint brushes with paint strokes at the bottom of the page. Whilst mine doesnt quite look like Elisa's, I am pretty happy with it. Let's take a closer look....
The other tip that Elisa outlines in this kit and that I wanted to bring to your attention today is using your wooden veneer pieces as stamps. As you can see below, the skull and the peace sign (both come in the kit) were used to stamp on to the graffitti wall background.
To achieve this look, I simply applied paint to the piece using a paint brush, turned it over and stamped on to my layout! What a great idea! You could use any wooden veneer pieces you have in your stash and create stamps with them! Shop and Crop have an extensive range of wood veneer products in store that can be purchase by clicking here. I'd love to see what results you get trying this technique and thinking about how we can extend and use our supplies in various ways.
Until next time, happy creating!

Monday, 28 August 2017

'Summer Loving' By Elisa Ablett

Hi everyone,


Elisa here from the design team back with a simple tutorial using the new Tim Holtz Distress Ink Oxides to make a mixed media layout using the leftovers from the August Crop Kit and a few things from my stash.

The Crop kit is chock full of amazing papers and embellishments and so far I have made 4 layouts out of it with leftovers !

If you are after Oxide inkpads or a Crop Kit order through
Kylie at the shop and use the code EA5 to receive a discount on me 😀😀

Kylie and I have come up with a special bundle deal for customers - Buy all 12 colours in series 1 and series 2 colour releases for a special price and receive an even further discount if you use the code EA5 just message Shop and Crop Scrapbooking for the details!!!

Here is my layout, a mixed media beach inspired layout.


Let's Get on with the tutorial!

I picked these lovely four beachy colours and grabbed my trusty water spray bottle to begin.

If you are unsure what the Oxide inkpads are and what makes them so crazy special, this is a description coming from Ranger and Tim Holtz -

"Tim Holtz Distress Oxide Ink Pads are water-reactive dye & pigment ink fusion that creates an oxidized effect when sprayed with water. Use with stamps, stencils, and direct to surface. Blend using Ink Blending Tools and Foam. Re-ink using Distress Oxide Reinkers"


Because they have pigment ink blended in with them they will stamp with a fine image, they are opaque so will show up perfectly on a dark surface, you can also layer the colours on top of each other and they still retain the colours and do not turn into brown smoosh. And the best thing is they still react with water like the Distress Ink pads.

I will be showing you a quick and simple tutorial on how to use these wonderful inkpads and how to apply them to a mixed media layout...


Step 1 - Grab your ink pad and smoosh it or wipe it onto your mat (special crafters mat that can be wiped over) spray the colour with water liberally to create large droplets


Step 2 - Turn a piece of mixed media cardstock over the colour on your sheet and place it on the colour. Now to get the droplets you can just pull the sheet back up without rubbing the back of the sheet with your hand or you can rub the back of the sheet to get a different look. Pull the sheet off the colour and dry with a heat gun.


Step 3 - While you are drying with your heatgun, grab a water spray bottle - the distress spray bottle is the best for this job as it releases rather large drops and spray onto your sheet over the colour and you will get this lovely oxidised droplet effect. 


Step 4 - After your first layer of colour, you can now add layer after layer using the same technique!! you will get a multi colour effect with lovely droplets and crazy oxide effect.


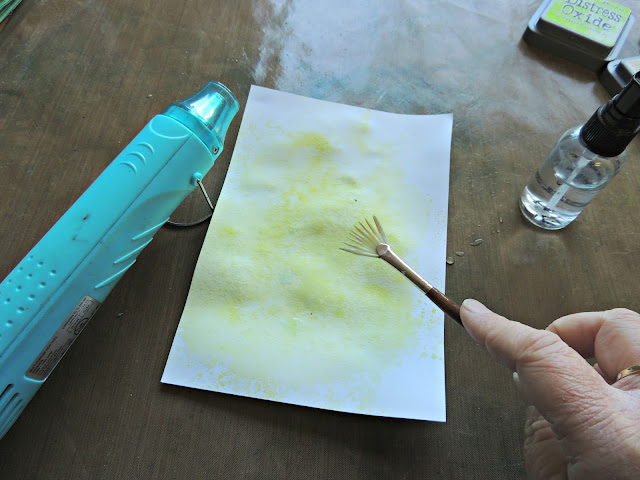
Step 5 - At the end you can also add another technique using a fan brush. Smoosh your colour onto your mat, add the water and then using the brush instead, dip it into the colour and tap generous droplets of colour onto your page and dry with a heatgun.

Below is a few examples of the end result of these techniques! perfect to use on a beach inspired layout ....right ??


Here is a few photos on how I incorporated these techniques on my layout.


Adding background colour to my page using the smooshing on the mat technique.


Adding some droplets of Antique Linen Oxide Ink pad to my page.


Use the inkpads to cover wood veneer or chipboard and use embellishments like DIY hearts from Charms Creations to mop up the colour on your mat and they will match your layout!!


I also used the technique on a couple of die cut square frames, which is a different and unique way of colouring and adding them to your page.


Add some stamping over your frames...


And here are some close ups of the finer details 


Well that's it from me today, i hope you have enjoyed the tutorial and insight into how you can incorporate simple yet effective techniques into your layouts.


Hugs 

Elisa xx


Monday, 14 August 2017

'August 2017 Crop Kit Alternatives' by Elisa Ablett

Hi everyone,

Elisa here from the design team for Shop and Crop Scrapbooking with a different take on the August 2017 crop kit 

Here is the link to the August Crop Kit on the website, it includes papers and bit and pieces from the Hello Sunshine collection from Fancy Pants, ephemera pack, tag and labels and gorgeous lemon thickers.


Now if you are a subscriber you would have received your awesome kit by now with the instructions to create your layouts. I am lucky enough to receive one as well so I can show you a few alternative pages that you can make with the kit AND a few products from your stash!

My first layout is titled - Walking on Sunshine


I used Colour Blast Shimmer Cube in 'Sunshine' and Colour Blast Shimmer Spray in Lipstick to create a few coloured splatters on the background. Then some stamping over the top using a set of stamps by Prima - Ink and Layer in Flora and a lovely script stamp.

Here are some close ups of the layout.


A banner and layering!


Flower cluster to draw the eye to the photo.

💙💚💛💜

And here is my second layout - Soak up the Sun

More of a mixed media layout using the kit contents plus extras from my stash including black Dylusion spray, yellow acrylic spray by Marabu Art and Sunshine Colour Blast Shimmer Cube. Also I added a hand made sun and a gorgeous cloud embellishment from Charms Creations.


Here are some close ups - 


Here are some of the products used to complete these layouts -

Prima -Ink N Layer-Ink N Layer - Fragrant Flora-12 pcs

Colour Shimmer Cube - Sunshine


Colour Blast Shimmer Spray-- Lipstick


Thats it from me today, 

If you are looking to treat yourself, don't forget to have a look at our kit subscription options on the website, if you are already a subscriber to our wonderful kits stay tuned because the design team will be posting their takes on each of the kits through the month after each kit release....


We want you to know how to get the most out of each of your kits!!

hugs

Elisa xx


Saturday, 27 May 2017

'Sweet' by Elisa Ablett

Hi Shop and Croppers!

Elisa here from the design team with my take on this months 'tic tac toe' challenge. I decided to go diagonally across the board - stamping, embossing powder and cardstock.

Don't forget when ordering from Shop and Crop Scrapbooking you can use the code EA5 for a discount at the checkout.


Here is my layout - feminine with a gorgeous colour combination of pinks, golds and yellow.


I have a little step by step tutorial on how I created the flower embellishments on my page.


Step 1 - Using a good quality watercolour paper, stamp and embossing powder (Lindy's Embossing Powder in white).


Step 2 - Cover your stamp with embossing liquid or use an embossing stamp pad and heat emboss your stamped image.


Step 3 - repeat until you have stamped, embossed and heat set at least 5 to 6 flowers.


Step 4 - Open your tin of Prima Watercolour Pans - shimmering lights and using a spray bottle and paintbrush add colour to your stamped images. Spray your stamped image first with water. Add water to your chosen colour on your palette and using a wet paint brush move it around your stamped image. The embossing creates a resist effect for the watercolour.


Step 5 - Keep adding colour to your flowers, then once dry, splatter your flowers with gold splatter and fussy cut them out. Splatter your layout with the same gold splatter - I used a combination of Bling Colour Blast Shimmer Spray and watered down shimmering colour.


Here are some close ups of the finer details :-)


Here are some of the products used to create this layout. All available from the shop today ...


Colour Blast Shimmer Spray-Bling