Showing posts with label Cropaholic Kit. Show all posts

Thursday, 21 December 2017

December Cropaholic Kit - Using the stunning Kaisercraft Wandering Ivy........

Hello there.......

Tania joining you today with my last post for this year, that's a scary thought and to think Christmas is only a few days away, that is exciting though :)  
So today I wanted to share with you some layouts I created for our December Cropaholic Kit using the stunning Kaisercraft "Wandering Ivy" Collection, I have to say this is my new favourite collection from Kaisercraft, just love the beautiful tones of Blue and Green, what do you think??  So much jam packed in this kit, I made these three layouts and still had so much left over.  

For the first layout the used the gorgeous specialty paper as my base, and played with some of the chipboard and the mist which is in the kit to create a little bit of extra texture on the background!
If you like fussy cutting this kit is just perfect two as there is lots of gorgeous flowers to cut from the patterned papers, which you can see here on the layout below.  


A few close ups........


I continued with the theme of adding a little mixed media to this layout too but just used the mist by itself this time.  I also added more fussy cut flowers and some of the gorgeous wood veneers that came in the kit.


More close ups.......


For the last page I added lots of the silver Rhinestone strip bling - who doesn't love a bit of bling?  I added lots more fussy cut flowers to the page too as it just finishes them off perfectly!!


A couple more close ups......


Well that's all from me today.  Be sure to pop over to the store here and check out this amazing kit and all the awesome goodies that comes in it, this one comes with instructions to make all three layouts.  You can also check out all the other fabulous kits and products on offer, you won't be disappointed!  
Also don't forget there's still time to enter out challenge for this month - "Show us your Christmas Craft"  a $30 store voucher for the winner.........


Until next time,  a ver Merry Christmas to you all and safe and happy New Year, hope you all get very spoilt with lots of crafty goodness, hope I do lol.

Happy Crafting, Tania xx

Thursday, 19 October 2017

Spiring sunshine

Hello!
It's Donna here, celebrating the fact that the sun has made it all the way to Victoria, and I finally have some sunny days to enjoy!
I've made two spring inspired cards to celebrate.
I've used the lovely papers in the September Cropaholic Kit from Jillibean Soup.

This first card has a splash of Distress Oxide which I loosely painted onto white cardstock, then spattered on some more for good measure!
Onto this I adhered some flowers and leaves from the cutout sheet, cutting one of the bigger flowers in half ( I used the other half at the bottom of the page as a small tag) I used a sentiment from my stash, and some black and white striped paper from an earlier kit.


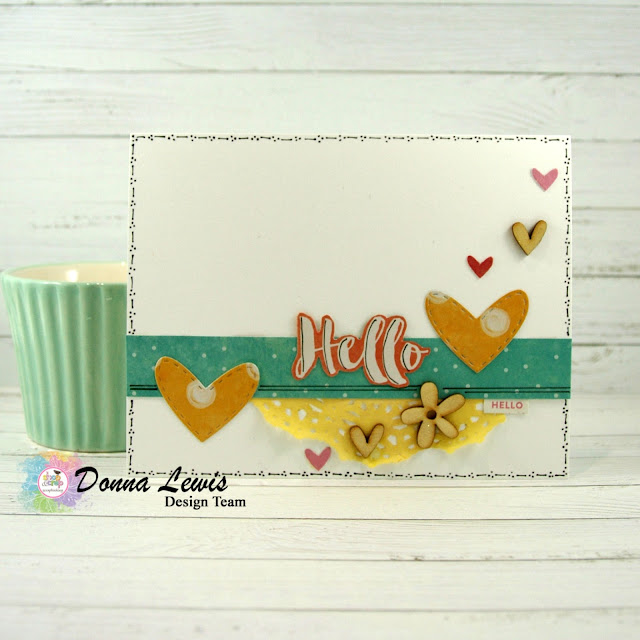
The second card has a mix of elements, all from different parts of the kit. The yellow hearts are the leftovers from an earlier shaker card that I made using the kit. The sentiment was cut from one of the papers, and highlighted with a black pen. I used a doily, which I coloured with Distress Ink.
I adhered the hearts so they appear to be floating off the page.

I hope that these cards give you some ideas so that you can make the most of your kits.

Until next time, may your days be sunny.
Blessings,

Donna
instagram donnadoll74

Wednesday, 11 October 2017

Having fun with the October Cropaholic Kit and a challenge.......

Hi there!  

Tania joining you today, with a couple of shares!  First up I have some pages that I created with the October Cropaholic Kit, you can see all the fabulous kits here!  Another challenge for me as you guessed it no flowers!!  But what an awesome kit to work with, just loved the bright, vibrant colours in the Kit which featured the "FLAWsome" kit from Flutterbys..........

My first page - "Amazing"


A few close ups........


"Loved"


Some close ups.........


"Shine Bright"


Some close ups........


 My final share for the day is my take on our latest Challenge we have running, this month is all about Reflection - show us your favourite piece or technique.......
One of my favourite techniques is I like to add a little or a lot of Mixed Media to my projects.

"Beautiful"


All these gorgeous papers,  the chipboard dream catcher and the small blue flowers were part of an awesome kit that Shop and Crop had on offer at the recent Melbourne Paperific Expo!  I used one of the patterned papers from the kit and tore it in half and used half of the patterned and half woodgrain papers for the background.  I then added texture paste with a brick stencil to the base paper randomly.  
Once dry I used added some Kaiser mist to it adding more colour around the areas that also have the brick stencilling.  I then used one of Kaiser texture Stamps "Botanical" and randomly stamped this over the page...........  I
 used a couple of different papers then from the kit and cut them down and distressed the edges to add a few layers behind my photo!  Once I had my photo where I wanted it I added the Chipboard Dream Catcher which I had previously coated roughly with gesso and then used the kaiser mist to add a little colour to it, and adhered it to the left of my photo.  To finish off the page I added some gorgeous flowers from the kit and also my stash and finished off by tucking some stickers from the sticker sheet in the kit into the flower clusters.

Some close ups of my page!


Well that's all from me today!  Be sure to pop over to the Shop and Crop store and check out the amazing kits we have on offer, always something different each month!  Also don't forget our monthly challenge,  a great prize up for grabs!  

Until next time Tania xx

Thursday, 5 October 2017

Reflections - shaker cards

Hi everybody,
It's Donna here with some more cards using the Jillibean Soup paper that were in the September Cropaholic kit.

The theme for this month's challenge is Reflections, and looking at our favourite projects. I chose this card that I made about a month and a half ago because I love it, and because it highlights one of my favourite things- shaker cards. Here is the card I'm talking about.


In this post I have also included a detailed how-to for making your own shaker cards or elements in your scrapbooking pages. 

I have below a picture of all the elements I used to make another shaker card below. The only things not pictured are clear plastic, like the plastic that the kits come in, and adhesive tape. The important thing here is the rectangular white piece with a square cut out of it. You can make any shape shaker, like the small hearts which are all individual shakers in the card above. If you have a cutting machine, this step is easy, but the same effect can be made by carefully cutting a hole out with scissors.

First I attached the frame to the front of the card. This is optional, but I thought for this card, the pop of green would stop the card from being too pink all over.
 Next, on the back of the panel, I laid down some adhesive tape (glue would be just as good) and cut a piece of plastic to just larger than the cutout window and laid it on top. If you look carefully, you can see the clear plastic in the photo below.
Once the plastic was in place, I added the next layer of adhesive. This time it was foam tape. You can do two layers if the bits that you want to shake around are thicker, as they were in the heart shaker card. The important thing is to not leave any gaps around the window, because the sequins will escape if you do! I had to be especially careful in this case, because the sequins, which come from my stash, are tiny, and also because the You are Amazing panel was only just bigger than the window.


I added some sequins to the middle of the window, then peeled off the middle tape, and placed the You are Amazing panel face down on the window. I then added a little more flat tape to the middle section.

Next, I peeled off all the backing and stuck the shaker element to my card, which was exactly the same size as the shaker panel.
 Finally, I added the flamingos and flowers to complete the card, using a mix of flat and dimensional adhesive tapes.
 Finally, here is the completed card.

Until next time, may you know how amazing you are,

Blessings,
Donna
@donnadoll74

Sunday, 20 August 2017

August Cropaholic kit - 1 cut, 2 cards

Hello crafty friends!

It's Donna here, and I'm hoping the weather is better wherever you are than here in Gippsland. As I made these cards, the temperature clawed its way up to 5 degrees by mid afternoon, and hail was falling!  A perfect day to stay inside in my happy place and make cards, I'd say!

I've used two of the gorgeous papers from this month's Cropaholic kit. This month's kit has a beautiful collection of papers from Jillibean Soup, as well as a whole bunch of stickers, ephemera and other goodies. 
I first used alphabet dies to cut the word 'Thank You' from the pink paper. I mounted this with dimensional tape on the gorgeous floral paper. Once this was done, I carefully stuck the centres of the A and O into their holes using teeny tiny pieces of dimensional tape. 
Next, because the front of the card was fairly plain, I added some of the lovely cutouts from the kit,  placing them to draw the eye diagonally down the card. The flowers are a wonderful complement to the floral paper behind, and of course being from the same kit, the colours match perfectly. I also added two thin strips of the teal spotted paper from the kit for some contrast. 


Here's a close up of the depth that can be achieved with the dimensional adhesive.


Next, I used the pink letters that I had cut out, stuck them onto a piece of the floral paper, thus creating a card that was the reverse of the first. Unlike the other card, which needed some additions, this card started out very busy, and needed to be toned down. First, I had to make sure the words stood out against the busy background, so I used my copic markers (R85 and R81) to deepen the colour on the pink paper I then outlined the letters in black before adding a layer of glitter using Wink of Stella and a layer of Glossy Accents. I also added the black strip and sentiment to ground the card and add a contrasting element. 


I've included some closeups to give you an idea of the shine and dimension that the glitter and glossy accents gives to the letters.


Hopefully this will give you some more ideas of what to do with the beautiful papers in the kit, for those of you who are lucky enough to be subscribers.
The Cropaholic kits are available either as a subscription, which gives you a saving each month, or as a one off, until stocks run out. If you'd like a further saving, just use the code DL5 to give you an extra $5 off. 
Until next time, happy crafting. May your days be sunny and warm!
Feel free to have a peek at my other cards if you are interested.
Donna